
Installation guide
How To Install The Reservai WordPress Plugin
Nine steps, about ten minutes. At the end you will have a booking widget, a services catalog, a customer portal and an AI booking assistant running on your own WordPress site.
Before you start
- A Reservai account. Create one free if you have not already.
- WordPress 6.2 or newer, and PHP 8.1 or newer.
- Administrator access to the WordPress site.
- At least one published service in Reservai — step 1 below.
STEP 1
Publish at least one service
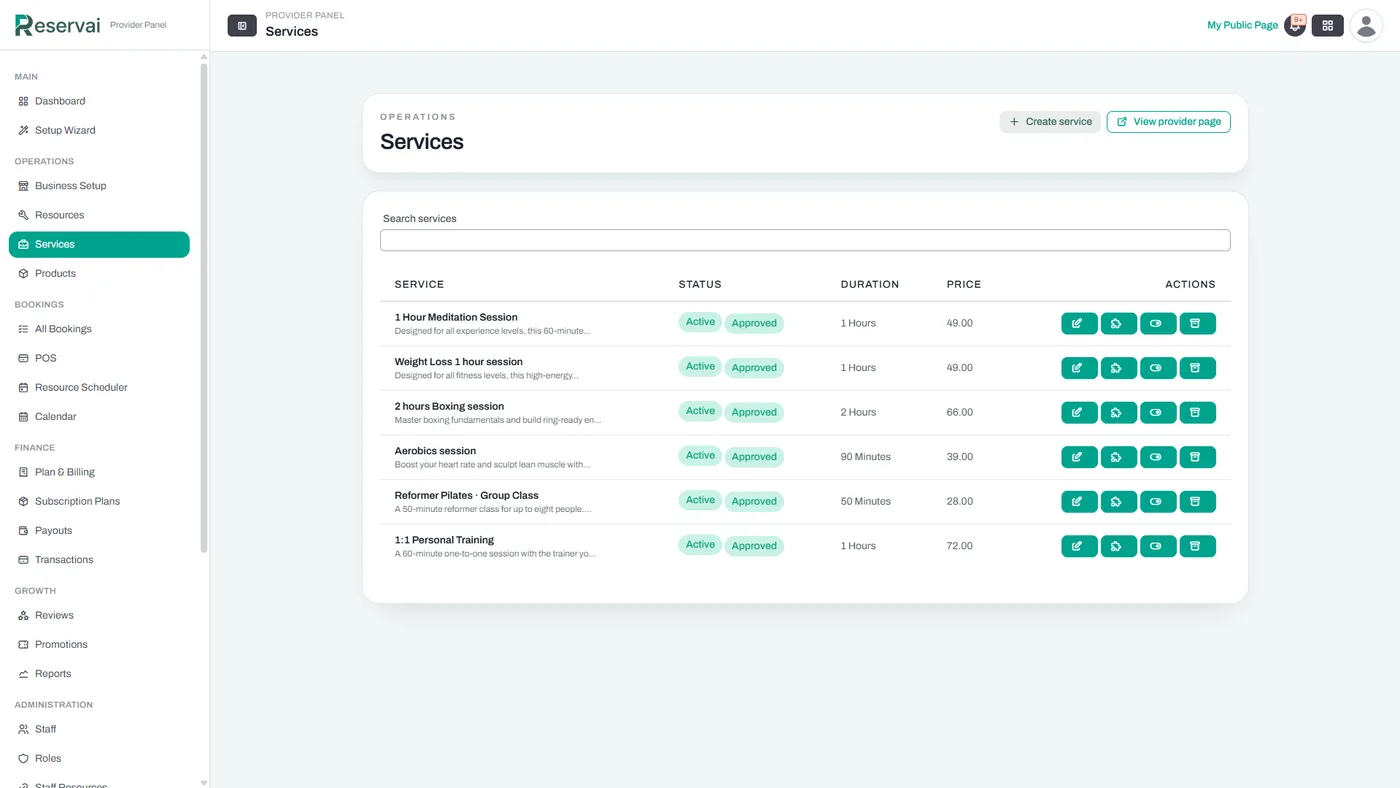
The plugin renders what is in your Reservai catalog, so there has to be something in it. In your Reservai account go to Services and make sure at least one service is Active and approved. If you are starting from scratch, the Setup Wizard walks you through a branch, a resource and a first service.
STEP 2
Create an API key
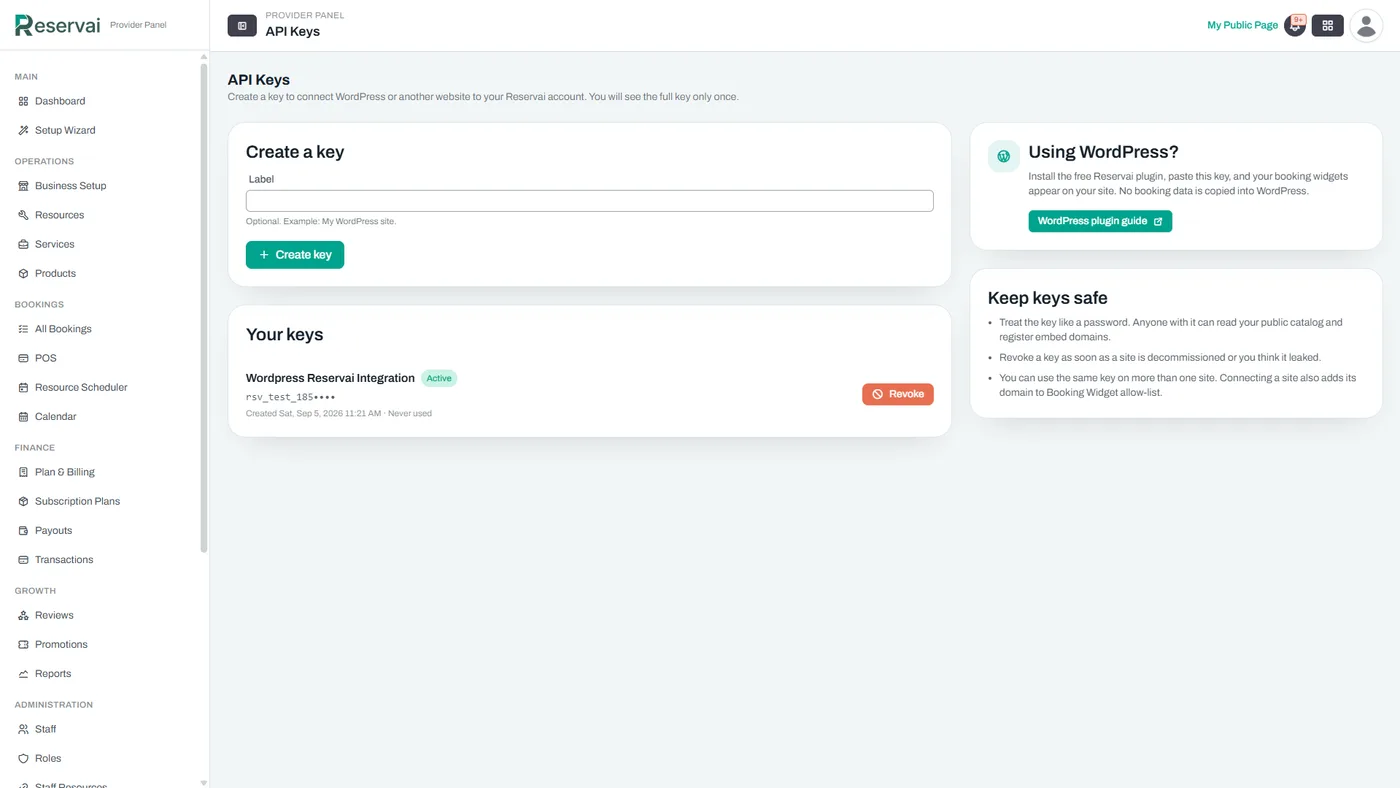
In Reservai, go to Settings → API Keys, give the key a label such as "WordPress", and click Create. Keys begin with rsv_live_ or rsv_test_.
Copy it now. The full key is shown once and never again. If you lose it, revoke it and create another — it costs nothing.
STEP 3
Install and activate the plugin
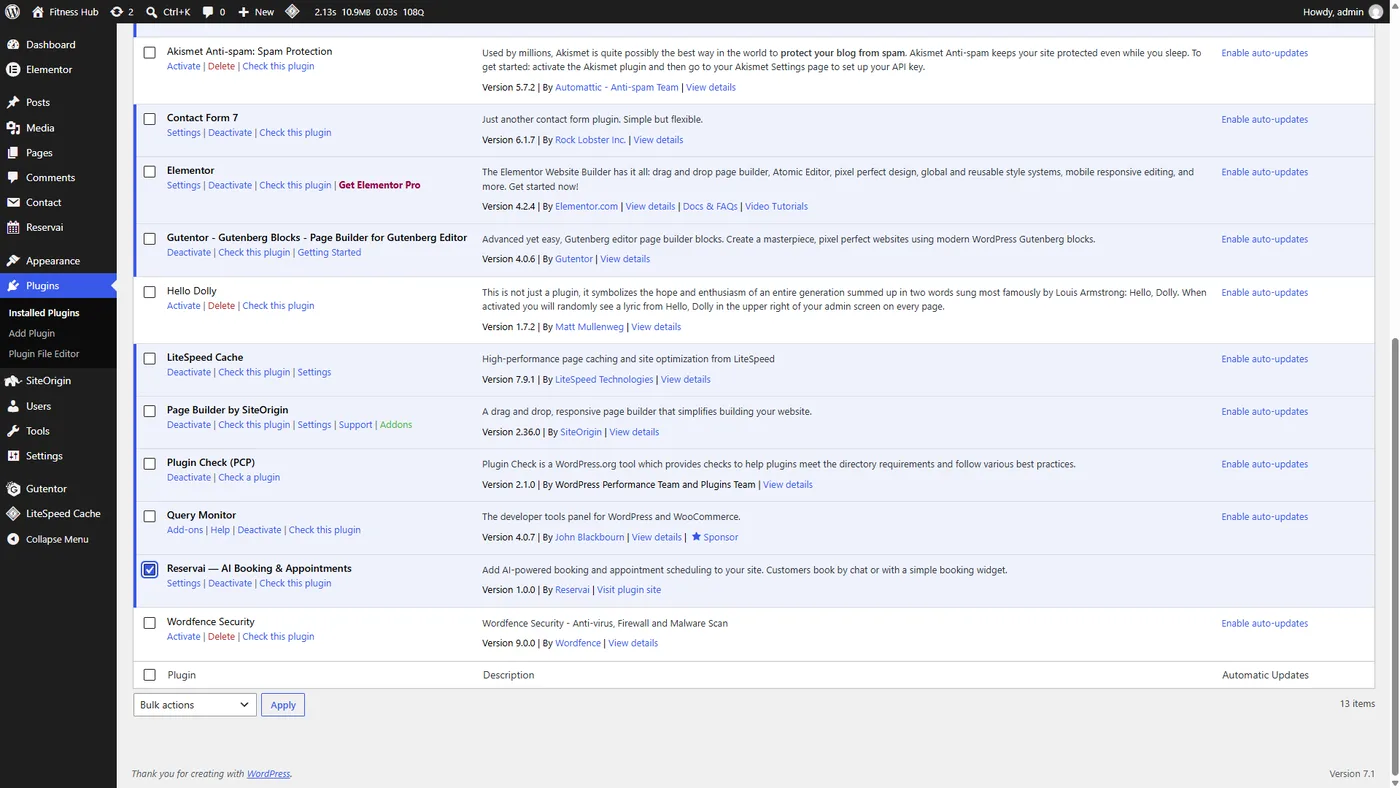
In WordPress go to Plugins → Add New, search for Reservai, then Install and Activate. If you were given a ZIP file instead, use Plugins → Add New → Upload Plugin. Once active, a Reservai item appears in the admin sidebar.
STEP 4
Paste the key
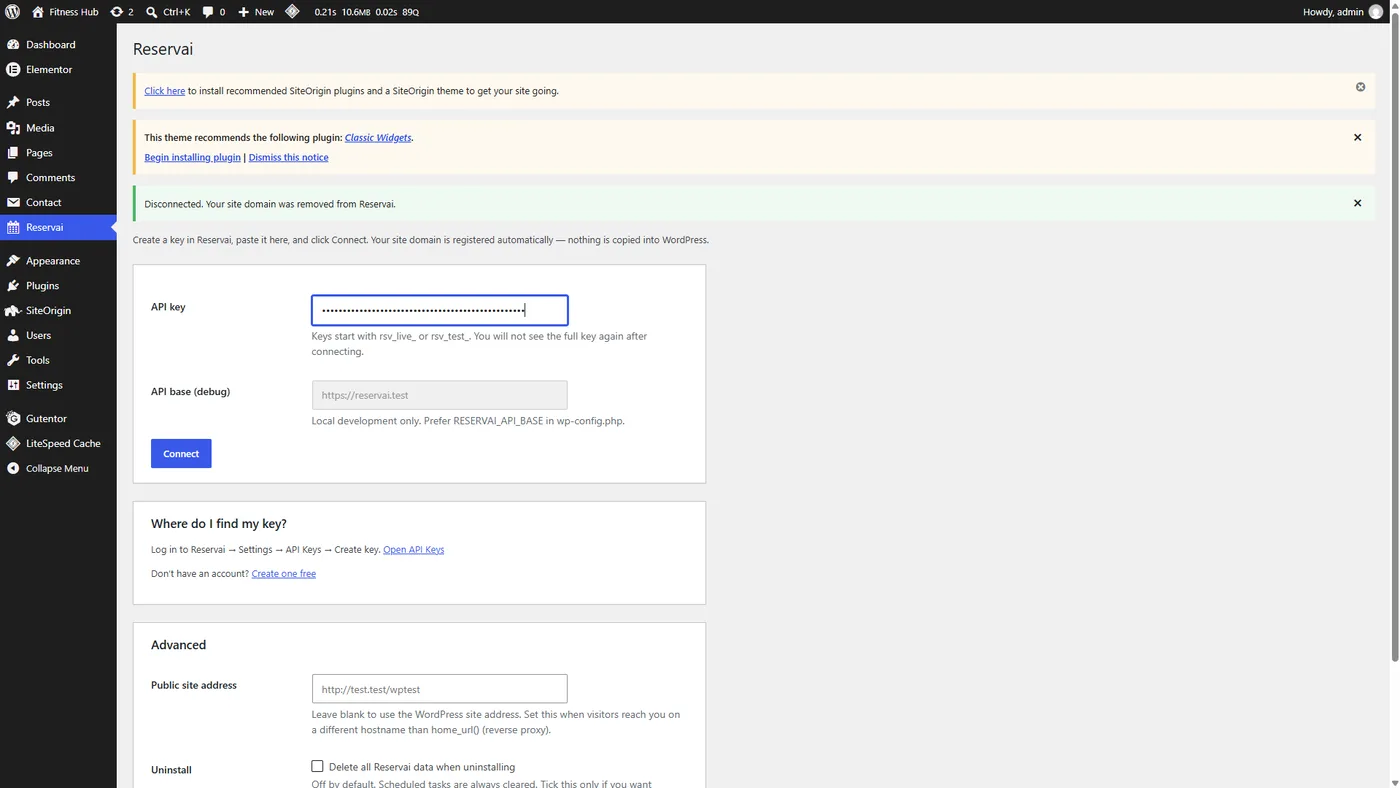
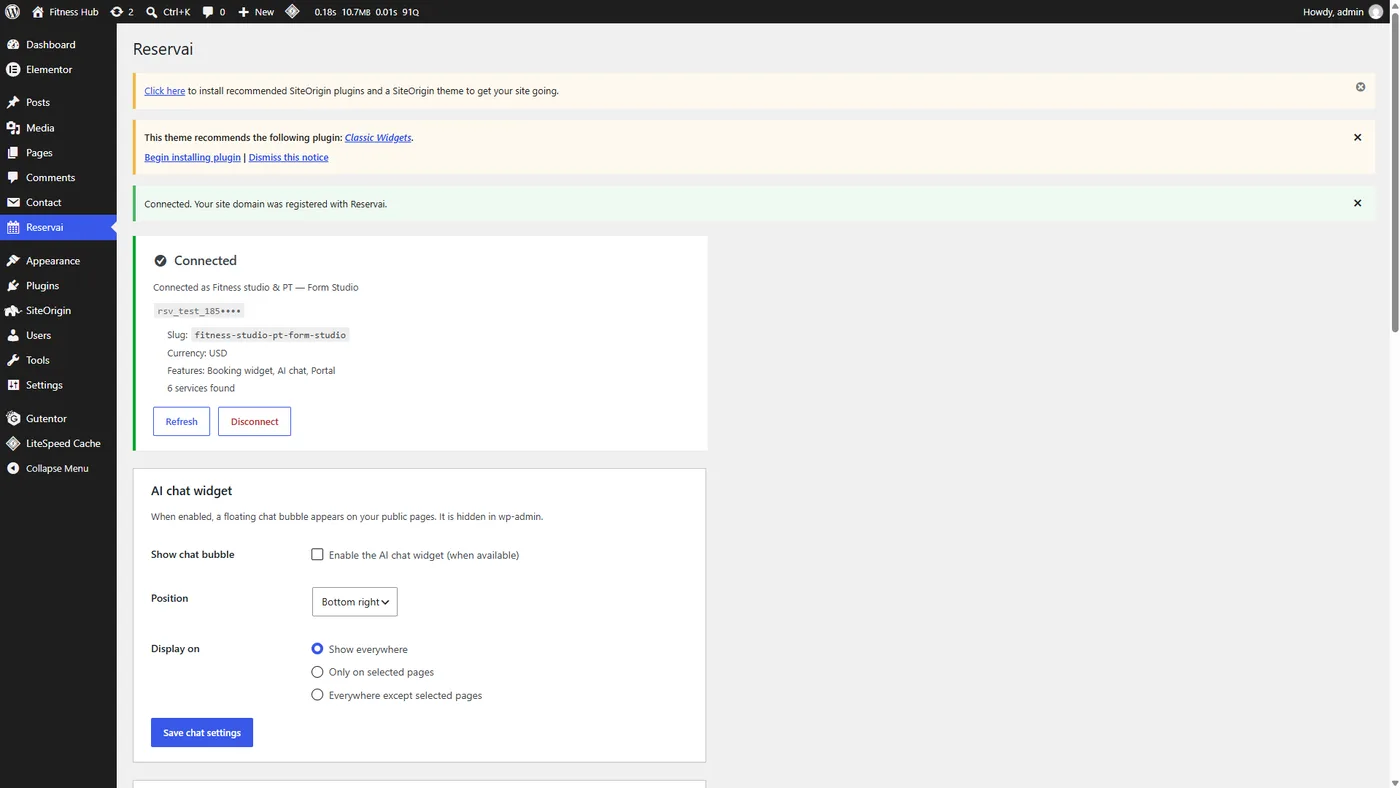
Open Reservai in the sidebar, paste the key into the API key field and click Connect. The panel underneath tells you where to find a key if you skipped step 2.
STEP 5
Check it says Connected
You should now see a green Connected card with your business name, your currency, the features enabled on your account and how many services were found. Your site's domain is registered for embedding automatically — that is the "your site domain was registered with Reservai" notice.
This screen is also where the AI chat widget is switched on, which we come back to in step 8.
STEP 6
Add a booking block to a page
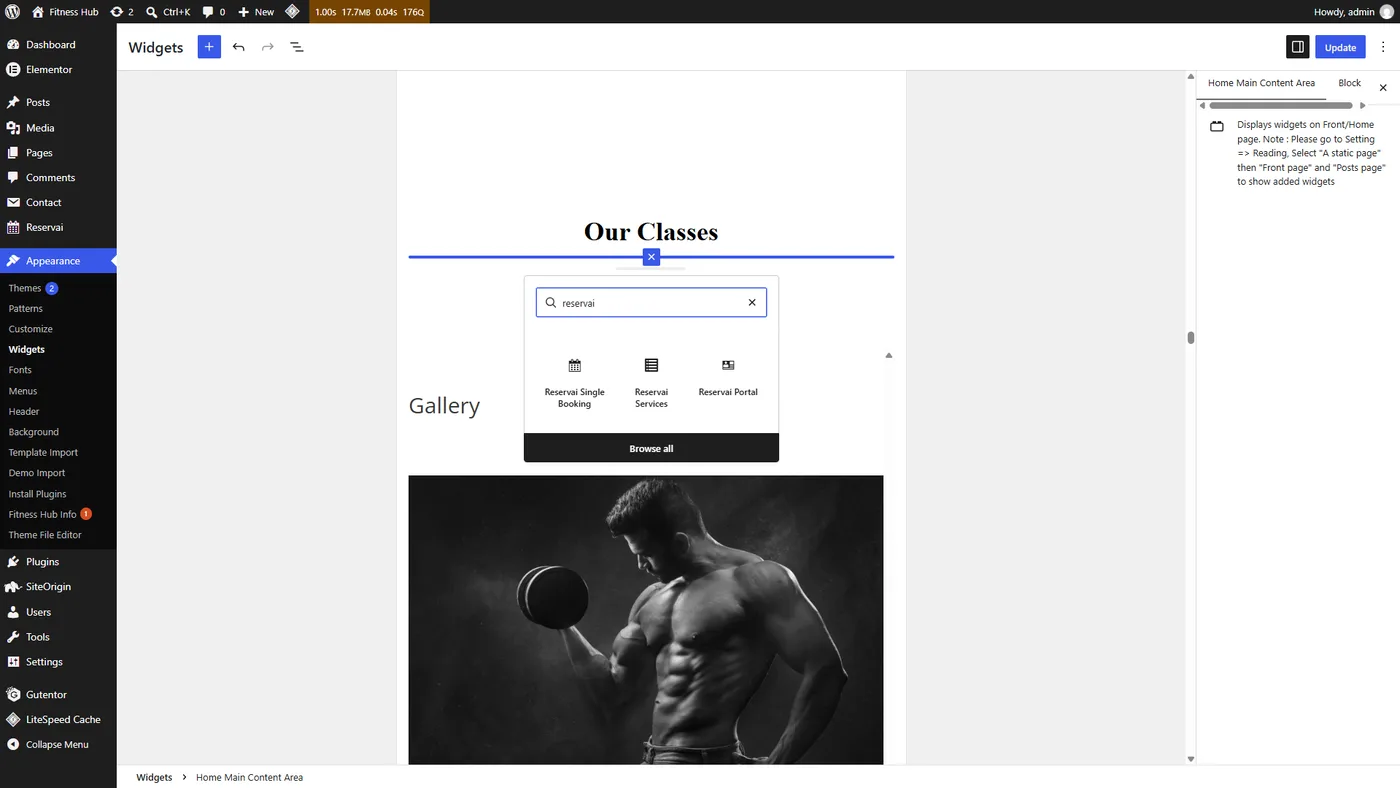
Edit any page, click +, and type Reservai. Three blocks appear:
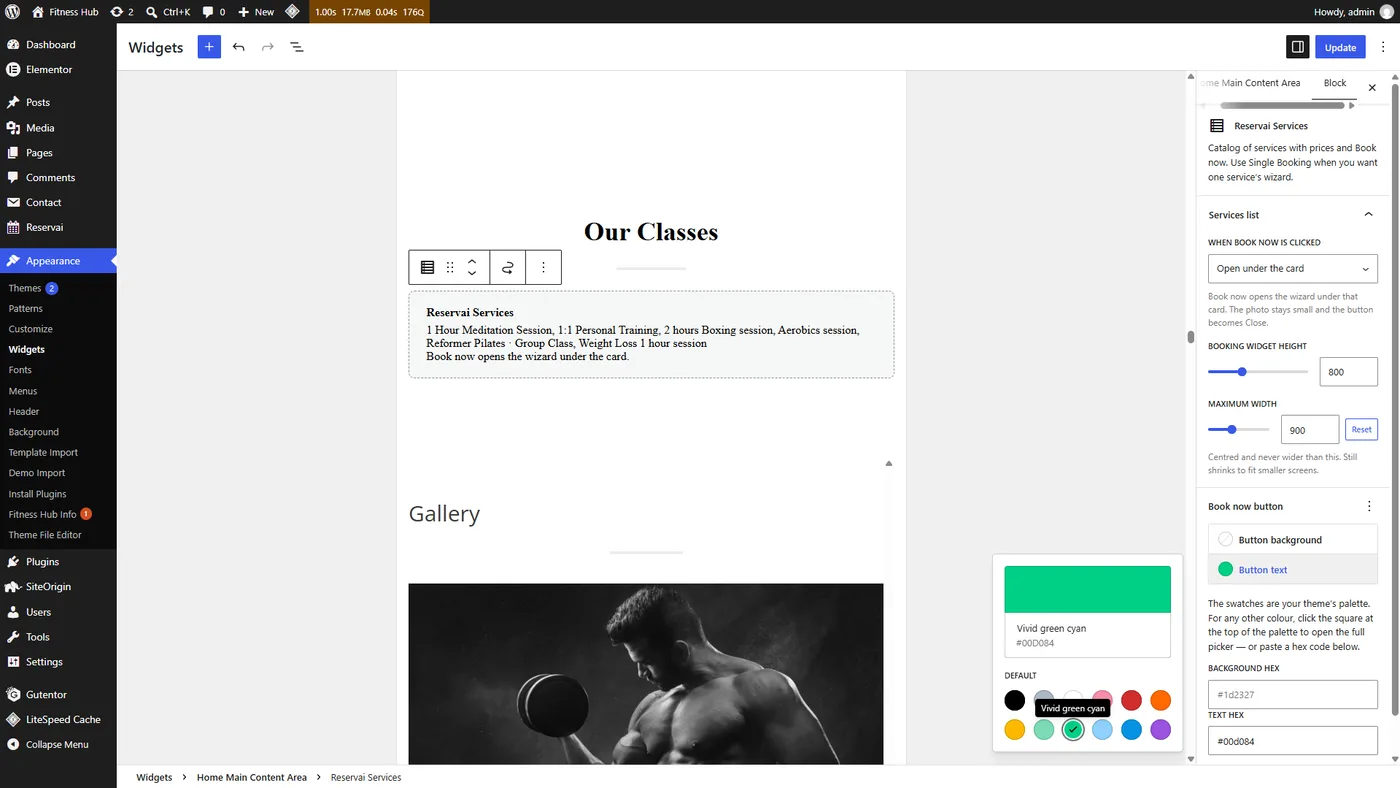
- Reservai Single Booking — the booking wizard. Pick one service in the block sidebar, or leave it empty to show the catalog first.
- Reservai Services — your catalog with prices and Book now buttons.
- Reservai Portal — the customer portal, covered in step 9.
With the block selected, the sidebar on the right sets which service it points at and how it behaves.
Not using the block editor?
Shortcodes work anywhere shortcodes work — the classic editor, Elementor, Divi, page-builder text widgets:
[reservai_booking service="your-service-slug"][reservai_services][reservai_portal view="bookings"][reservai_chat]
STEP 7
Publish, and look at it logged out
Publish the page and open it in a private window, so you see what a visitor sees. The booking widget walks through branch, resource, add-ons, date and time, details and payment, with a running price panel.
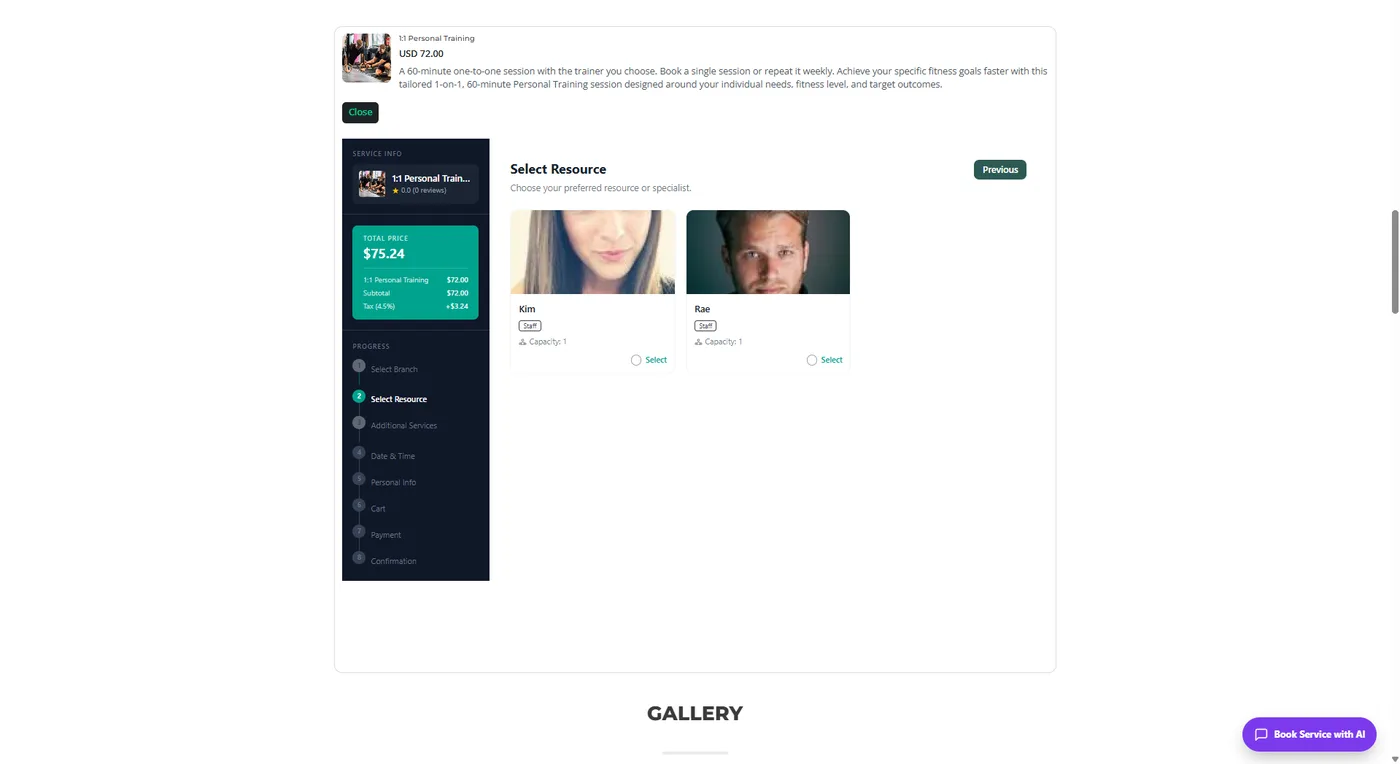
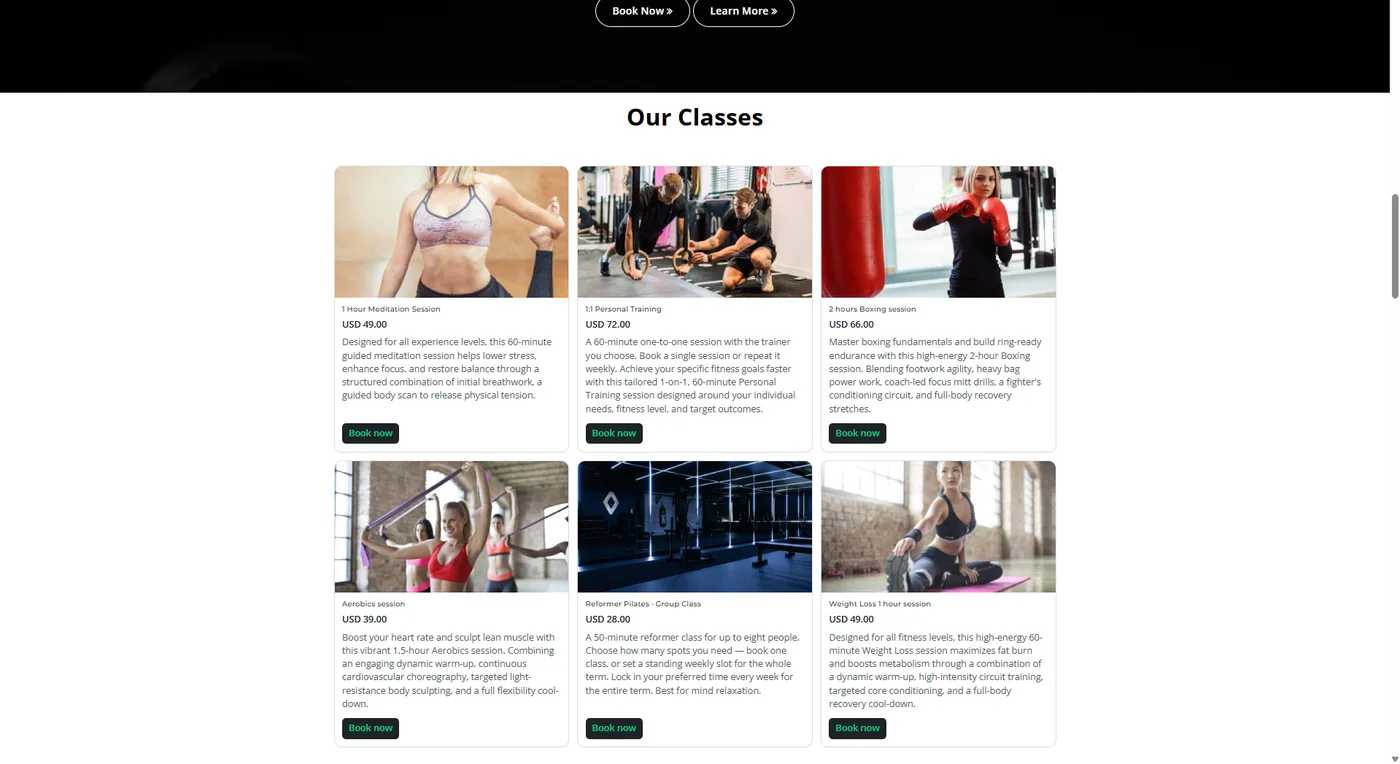
The services block looks like this — your live catalog, styled to sit inside your theme.
STEP 8
Turn on the AI booking assistant
Back on the Reservai settings screen, tick Enable the AI chat widget, choose a corner, and decide where it appears: everywhere, only on pages you pick, or everywhere except pages you pick. Save. A floating bubble now appears on the front end, and never in wp-admin.
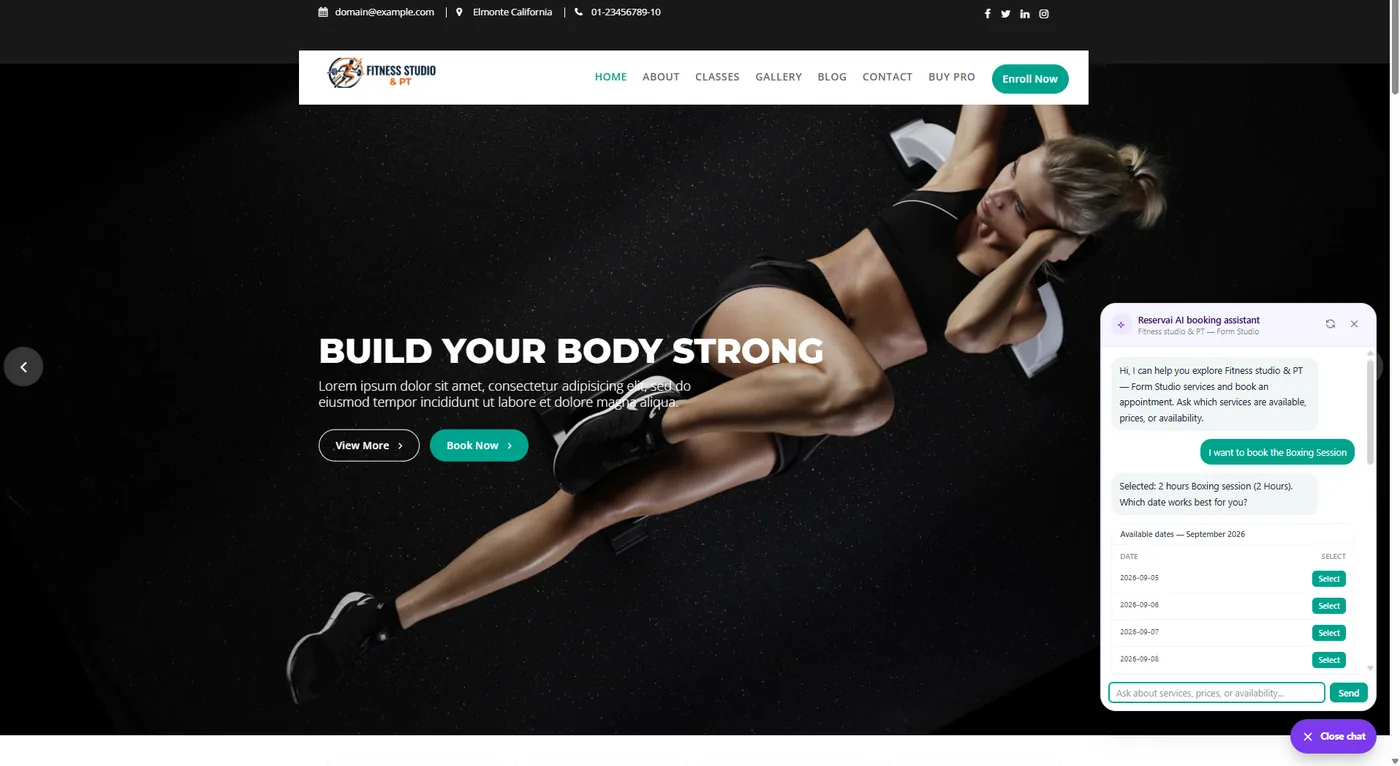
The AI booking assistant is an optional paid add-on on your Reservai plan. If it is not enabled on your account the toggle stays available but the bubble will tell visitors the assistant is not currently available. Everything else in this guide works without it.
STEP 9
Give customers a portal
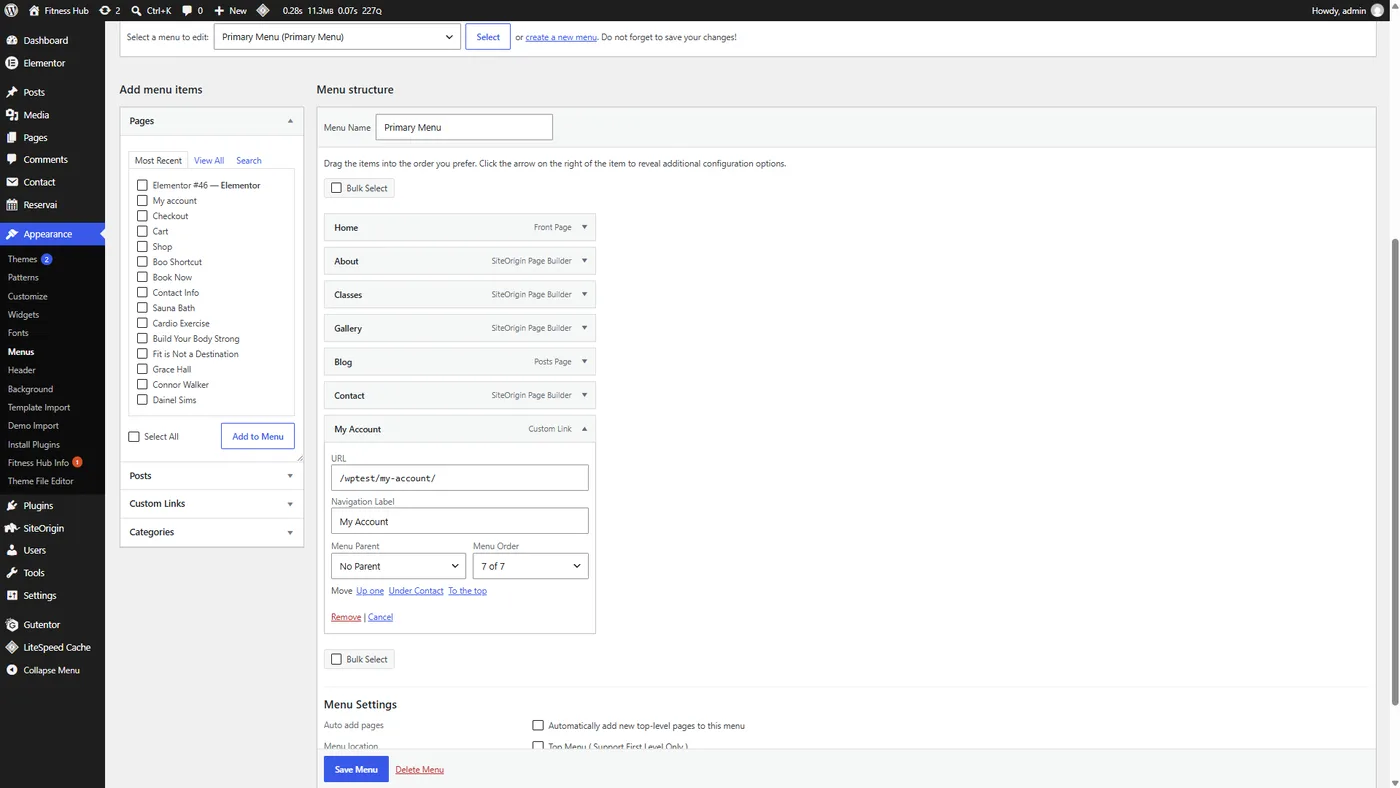
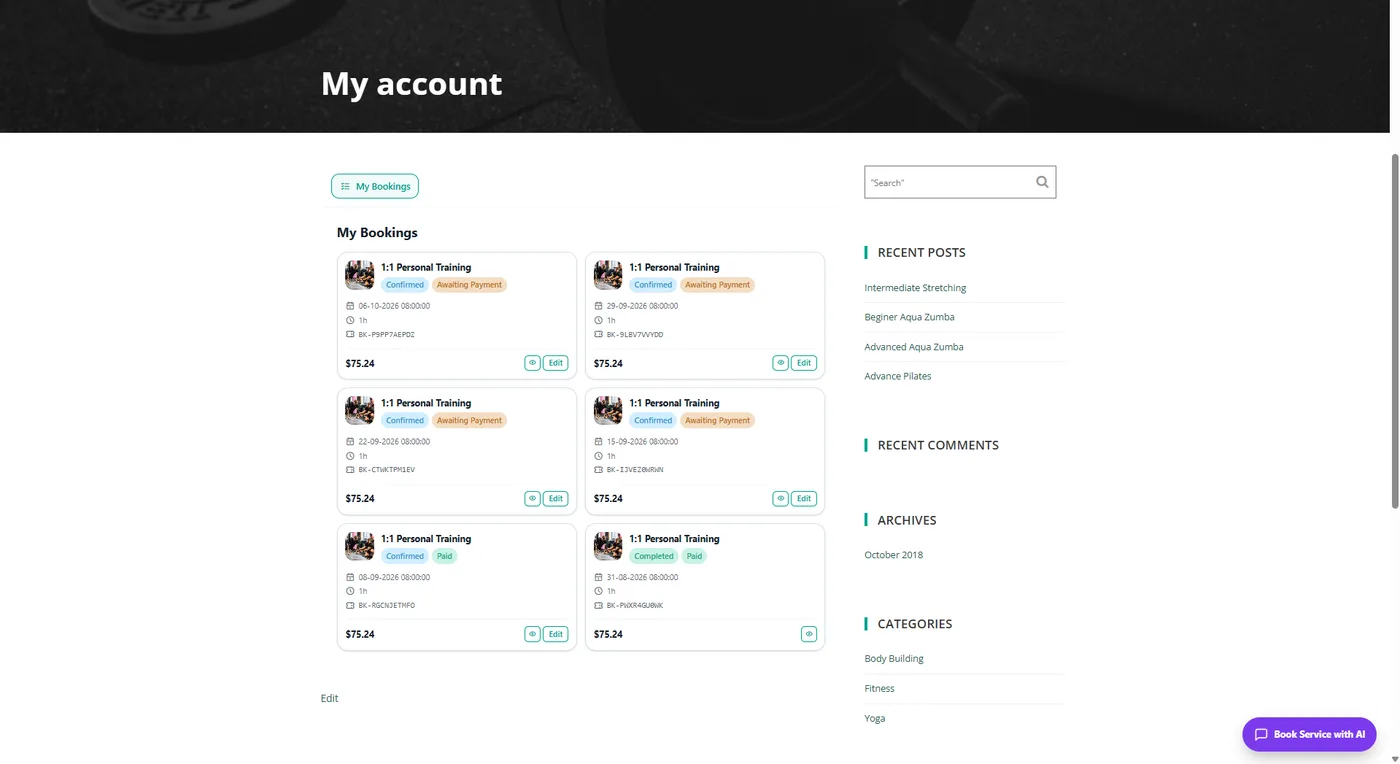
Create a page called My account, add the Reservai Portal block, and publish it. Then add it to your menu under Appearance → Menus so people can find it.
Customers identify themselves with a code sent to their email — no WordPress account needed, and no password for you to support.
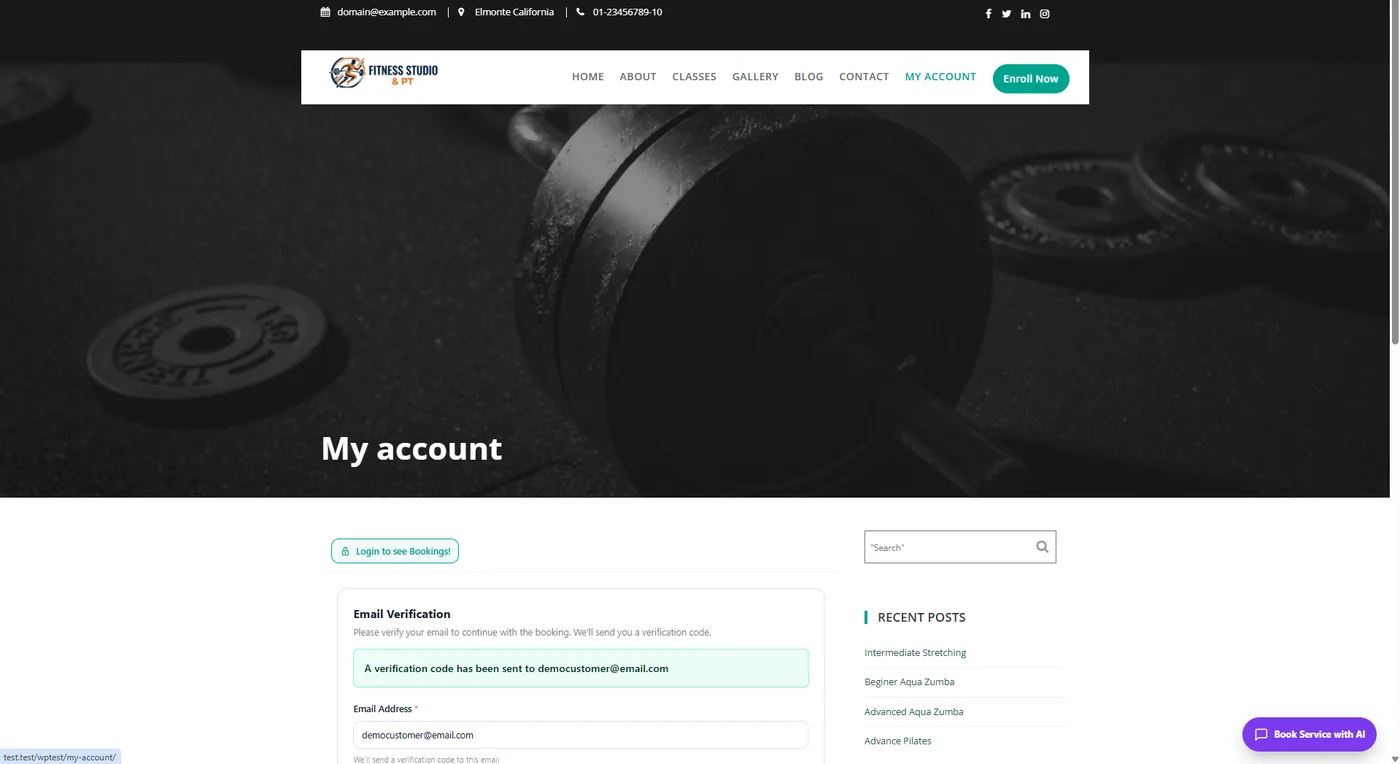
Then they see their own bookings, with status and outstanding balance, and can reschedule, cancel or pay — on your domain, inside your theme.
Domains and embedding elsewhere
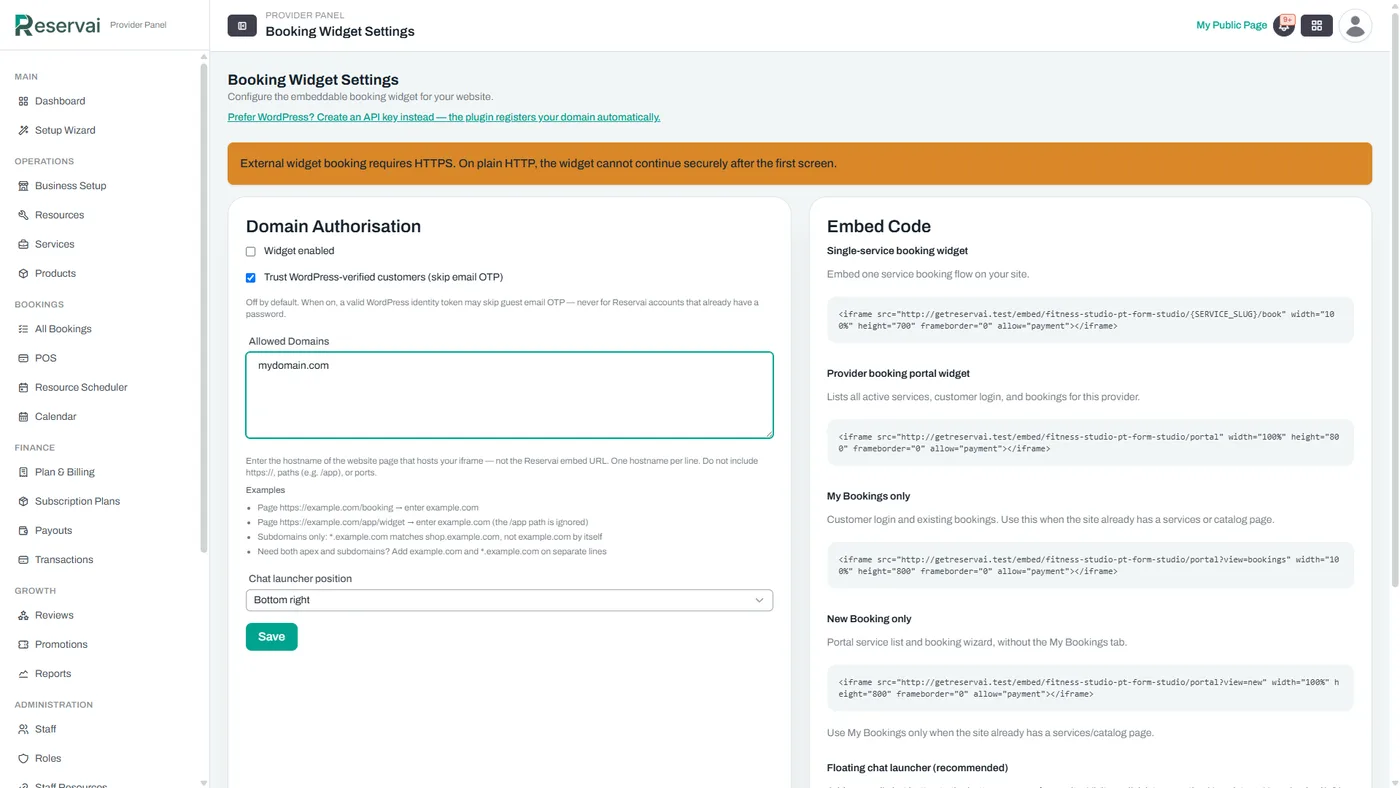
Connecting the plugin registers your WordPress domain automatically, so you normally never touch this. If you also want the widget on a second site — a landing page, a different domain, a non-WordPress site — add that host under Settings → Embed in Reservai, where you will also find the plain HTML embed code and the chat loader script.
If something is not right
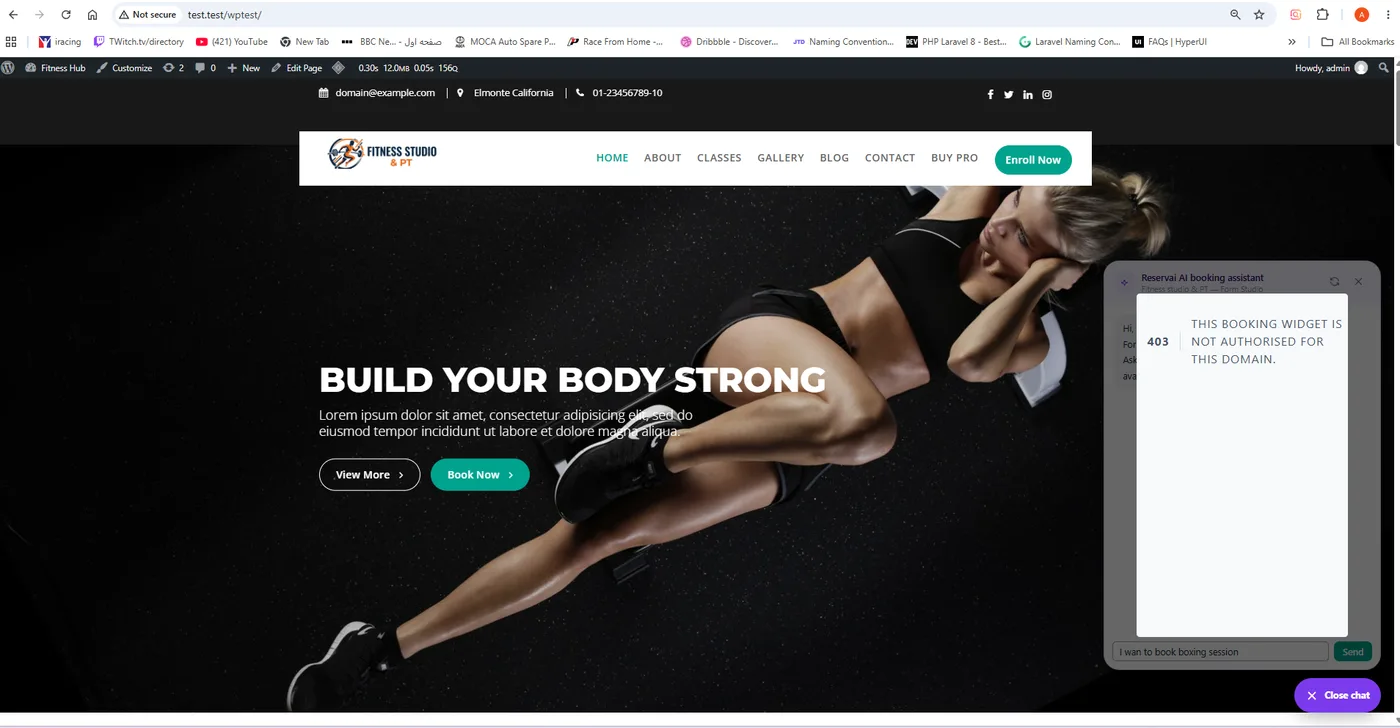
"The booking widget is not authorized for this domain"
The page is loading from a hostname Reservai does not recognise. This normally happens when the site is reached on a different host than WordPress thinks it uses — a staging URL, a reverse proxy, or www versus non-www. Click Refresh on the plugin settings screen to re-register, or add the exact hostname under Settings → Embed in Reservai.
The key is rejected
Check there is no stray space at either end, that it starts with rsv_live_ or rsv_test_, and that it has not been revoked in Reservai. If in doubt, create a new key — old ones keep working until you revoke them.
The widget area is blank
Usually a caching or optimisation plugin stripping the embed, or a script blocker. Clear your page cache, and exclude the page from JavaScript combining or deferral. Also confirm the block actually has a service selected.
The chat bubble does not appear
Check that the AI chat widget is enabled and that the display rules include the page you are looking at. The bubble is deliberately hidden inside wp-admin. If the AI add-on is not active on your Reservai plan, the assistant will not be available.
My services list is out of date
The plugin caches your catalog briefly. Click Refresh on the settings screen to pull it again.
The connection broke after a domain change
Click Refresh to re-register the new domain. If your visitors reach you on a different hostname than home_url() returns — a reverse proxy, for instance — set the public site address in the plugin's Advanced section.
Advanced
Keep the key out of the database
Add this to wp-config.php and the settings field is disabled — useful if your key is managed by deployment rather than by hand:
define( 'RESERVAI_API_KEY', 'rsv_live_…' );Booking prefill and POS lookup
Both are off by default. Prefill sends a logged-in visitor's name, email and phone — including WooCommerce billing fields when present — so their booking form arrives filled in. POS lookup lets your own staff search those same fields on this site when taking a walk-in. Passwords, roles and order history are never sent.
Uninstalling
Deactivating and deleting always clears scheduled tasks. Your settings are only removed if you tick the option to delete them on uninstall, so you can safely deactivate and reactivate without reconnecting.
Still Stuck?
Open a ticket from Support inside your Reservai account, or ask on the plugin's support forum on WordPress.org. We answer both.
About the plugin